Weathering is the process of making a model more realistic by simulating the effects of rain, sun and wind on our models. Models can be weathered using many techniques with paint, artist chalk, and other commercial products. The goal of this article is to share a technique that will enhance your model by making is look more realistic and true to the prototype.
Background
This web page is inspired from a clinic presented by Todd Gayhart at a Northwest Trainmasters meeting in April, 2006. Todd demonstrated the effects you an achieve by applying chalks with wet paint brushes. I tried his technique for the first time and I really liked the results. I will definitely use this technique on other models.
Prototype Reference
I went on the internet to find a prototype reference for the model above. Though I did not find an exact match I did locate a few cars that I wanted to simulate. I used the following two prototype photos from rr-fallenflags as my guide.
LO 116 – Cadillac MI – 02/26/84 {Dennis Schmidt Photo}
LO 117 – Owasso MI – 11/24/84 {Dennis Schmidt Photo}
Tools and Supplies
- Old paintbrush (000)
- Old large “poofy” paintbrush
- Hobby knife
- Dull coat lacquer
- Bragdon Weathering Powders
- Grimy black paint
- Engine black paint
- Paint thinner
- Index card
Safety
The tools and materials in this tutorial require extra safety precautions. Please work in a safe manner and observe all safety and use recommendations by the manufactures of the tools and materials mentioned in this article.
Step-by-Step
Remove Wheels – I started the model by removing the metal wheels and trucks. I wanted to paint them separately. I gave the truck side frames a coat of Polly Scale Grimy Black, the wheels a coat of Engine Black and then I set them aside to dry.
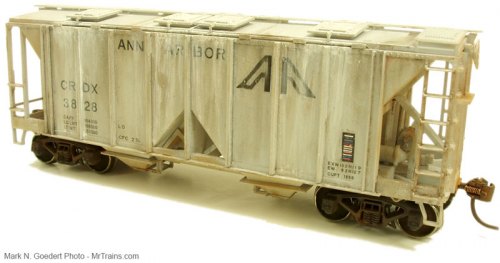
Technique – The car sides were done using a technique that Todd Gayhart demonstrated at our Northwest Trainmasters club meeting. He showed us a technique using a small wet paint brush to apply and streak chalk down the side of the model. He demonstrated the technique on a few models as part of the clinic and the results were very realistic. The car pictured above is my first attempt with the chalk method as presented by Todd.
Chalk Preparation – Place some chalk on a piece of cardboard by using a hobby knife to scrape the side of the chalk toward the cardboard. Use a small brush (000) with a good point and wet the brush in some water. Pat off the excess so you don’t have a large drop of water on the end of the brush. Then, place the brush in the chalk to pick up a small amount on the brush.
Chalk Application – Place the brush to the model and streak it downward. This will provide a painted on streaking effect. The beauty is, if you don’t like it, the chalk can be wiped away after it is dry. I applied several blobs of wet chalk on the model and used a stiff tooth brush to streak it downward. You can see the interesting effects it created.
Hatch Detail – I detailed spillage from the hatches by dry-brushing white paint around the hatch covers and down the side of the model. After dry-brushing around the top hatches I used thinned white paint to achieve the streaking effect of the spillage down the side of the car.
Spray Fixative– Once everything was in place, I sparingly applied dull cote to the model to seal the chalk and provide a protective shell to the model.
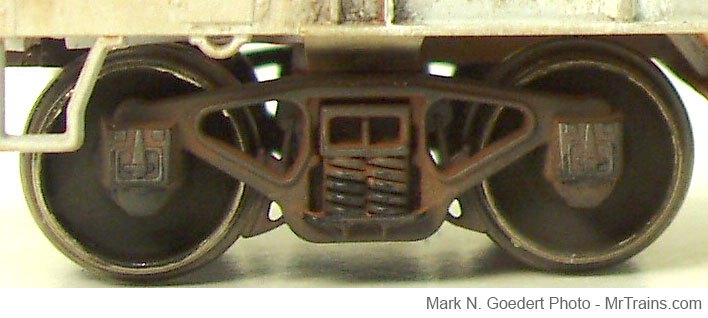
Trucks – I then went back to the trucks and applied Bragdon Enterprises adhesive chalk to the side frames. I first mixed some chalk on a index card and then used a large “poofy” brush to apply the color. I found the best effect was to mix a few of the rust colors together on the index card before applying.
Adhesive Chalk – is powdered chalk with a dry adhesive mixed in. When you press the chalk against a model the dry adhesive holds the chalk in place. You can achieve interesting effects using the chalk however once applied you cannot remove the powder. Work slowly and deliberately when applying the adhesive based chalks. If I inadvertently messed up the trucks I would have repainted them with Grimy Black and started over.
Wheel Treatment – To treat the wheels I used a smaller brush to apply the adhesive powder to the inside of the wheels. This helped convince us that the wheels are a bit oily mixed with rust.
Above you can also see that I added a bit of thinned Engine Black to represent oil leaking out of the journals and a bit of lubricant on the springs. After the painted trucks and car body are dry, reassemble the wheels on the car.
Conclusion
It has been a long time since I first weathered a car. I encourage you to give this technique a try. It is fairly reversible and when combined with some paint and the Bragdon adhesive chalk you can come up with a pretty neat (weathered) model in a couple of nights.


