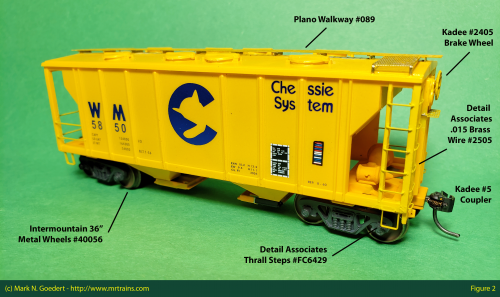
This article shows how you can give some life to a dated freight car model with a little money and a lot of time. This by no means brings the model up to the current standards of super-detailing however it does let the model stand on its own. The completed car has over 30 individually formed grab irons and features an etched metal walkway installed across the top of the car.
Tools and Techniques
There are a few tools and techniques that really helped the project move along. It is important to take all necessary safety precautions when modeling; please refer to and observe the manufacturer recommended safety warnings when working on your projects.
The basic tools used were needle nose pliers, hobby knife with sharp #11 blades, Xuron sprue cutters to remove the steps, and various files to clean up the posts after cutting. A full parts list can be found at the end of this article.
The etched metal roof walk is a huge improvement to the model. I originally used cyanoacrylate (CA), known as superglue, to attach the walkway components together. After several trips to various train shows and the club the walkway began to detach from the model. I learned a technique from Brian Banna where he would mix methyl ethyl ketone (MEK) and Barge Cement to form a thin but flexible and strong bond. A small brush was first dipped in the MEK then the thinned barge cement/MEK mix. The barge cement and MEK mix was then applied to the parts. After using this technique, the results have been excellent with the walkway firmly attached to the model.
The other key technique was the use of a bending jig made from Evergreen brand styrene siding. This tool was originally crafted by Bob Hundman of Mainline Modeler. I used this tool extensively to bend over 30 grab irons of various sizes for this model.
Lessons Learned
After hosting a short clinic with the Oak Park Society of Model Engineers there were a few improvements suggested that if I were to do this again would be considered. The prototype on my layout is in the 1970s, given the age of the car, would likely have had 33” wheels and not the 36” I installed. Additionally, an inspection dot would have also been applied to the car indicating that the wheels do not have a flaw and the car is available for interchange. Two minor changes that would help bring this car a bit closer to a prototype representation.
Parts and Materials
The following parts and materials were used to improve this model. Items such as the Kadee couplers and Intermountain wheels are my standard upgrades to all rolling stock. It is the custom bent grab irons and Plano etched metal walkway that greatly improve this model.
| Manufacturer | Part No. | Description | Qty |
| Detail Associates | 2505 | .015 Brass Wire (to make grabs) | 1 |
| Detail Associates | FC6420 | Thrall Steps | 1 |
| Evergreen | 4061 | Clapboard Siding .040 thick, .060 spacing. Used to create the bending jig. | 1 |
| Intermountain | 40056 | 36″ Metal Wheels | 4 |
| Kadee | 5 | #5 Standard Coupler | 1 |
| Kadee | 2045 | Modern Brake Wheel (Black) | 1 |
| MDC Roundhouse | Unknown | PS2 70 Ton 2 Bay Covered Hopper | 1 |
| Plano Model Products | 89 | PS2 70 Ton 2 Bay Covered Hopper Walkway | 1 |
| Squadron | SQ20201 | Putty to fill in the holes in the roof. Any modeling putty will suffice. | 1 |
| Testors | 8812 | 10 Hobby Sanding Films; 5 Grades: Coarse, Medium, Fine, Extra-Fine, Ultra-Fine; Types: Black 150 Grit, Light Orange 280 Grit, Dark Gray 320 Grit, Light Tan 400 Grit, Tan 600 Grit | 1 |


